Wondering how to install garage door weather stripping on metal, wood, and vinyl doors? This expert guide breaks down tools, steps, and pro tips for every door type.
Garage door weather stripping is crucial for homeowners seeking to enhance energy efficiency, prevent water damage, and keep pests out of their garages. Understanding how to properly install garage door weather stripping can save hundreds of dollars in energy bills and prevent costly repairs. This comprehensive guide from Grayson County Door & Gate will walk readers through everything they need to know about selecting, measuring, and installing weather stripping on different garage door materials, including metal, wood, and vinyl.
Understanding Garage Door Weather Stripping
What Is Garage Door Weather Stripping?
Garage door weather stripping is a protective seal installed around garage doors to prevent air, water, dust, and pests from entering. It consists of durable materials such as rubber, vinyl, or PVC that can withstand various weather conditions while maintaining flexibility to allow the door to open and close properly.
Why Weather Stripping Is Important
Weatherstripping serves multiple critical functions for your garage.
- Energy Efficiency
- Moisture Protection
- Pest Prevention
- Noise Reduction
- Extended Door Life
Types of Weather Stripping for Garage Doors
Bottom Seals
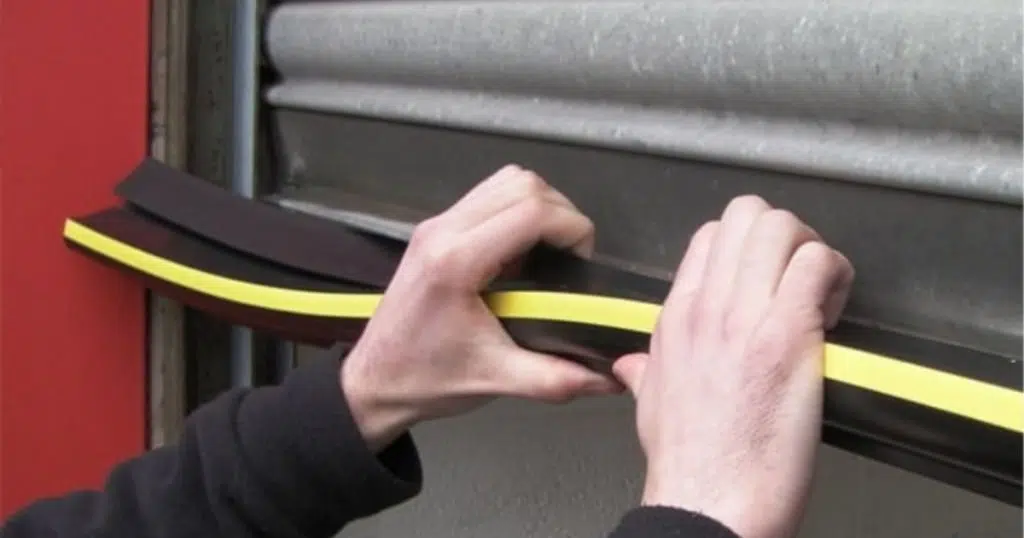
The bottom seal attaches to the lower edge of the garage door, making contact with the floor when the door is closed. Common types include T-style seals featuring a T-shaped rubber insert that fits into a track on the bottom of the door; bulb seals with round rubber tubes that compress when the door closes; U-shaped seals made of flexible vinyl that wrap around the bottom edge of the door; and brush seals made of stiff bristles, which are ideal for uneven floors.
Threshold Seals
Threshold seals are installed directly on the garage floor, creating a raised barrier against which the door closes. These are particularly useful for garages with uneven floors, areas prone to heavy rainfall or flooding concerns, and situations where aggressive rodent control is necessary. They create an additional barrier that works with bottom seals for maximum protection.
Side and Top Seals
These seals fill the gap between the garage door’s sides and top and the door frame. Options include stop molding seals (vinyl or rubber strips attached to the door frame), jamb seals (flexible weatherstripping that connects to the edges of the door jamb), and V-strip seals (V-shaped vinyl or metal strips that compress when the door closes). The right choice depends on your door configuration and the size of the sealed gaps.
Tools and Materials Needed

Essential Tools
Proper garage door weather stripping installation requires several basic tools. A measuring tape and marker are essential for accurately sizing your materials. You’ll need cutting tools, including a utility knife, scissors, and a hacksaw or tin snips, to trim weather stripping to the correct dimensions.
A pry bar and screwdriver set (both Phillips and flathead) will be necessary to remove old materials. A power drill with appropriate bits is crucial for securing new weather stripping, while a hammer may be needed for specific applications. Always prioritize safety by wearing work gloves and safety glasses throughout the project. Having a level on hand ensures proper alignment during the installation process.
Materials by Door Type
Below is a comprehensive table of materials needed based on your garage door type.
Additional Supplies
For a successful installation, you will also need cleaning supplies (broom, degreaser, rags), a wire brush for removing rust or old paint, lubricant spray to ease the installation process, a caulk gun and weather-resistant sealant for sealing gaps, and painter’s tape to assist with precise application.
Preparation Steps
Measuring Your Garage Door
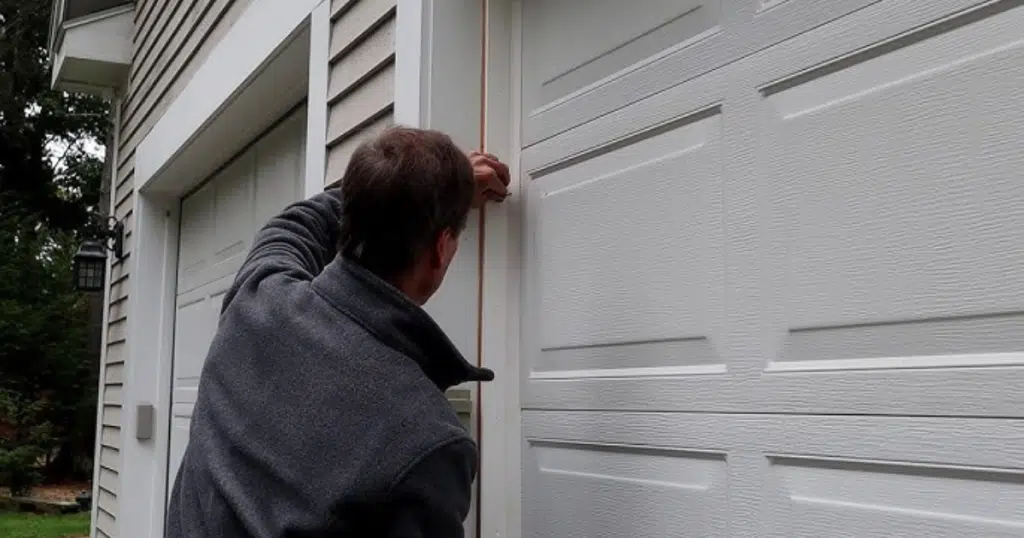
Accurate measurements are crucial for purchasing the right amount of weather stripping and ensuring a proper fit. Start by measuring the width of the garage door from end to end for the bottom seal. Then, measure the height of both sides of the door frame from the floor to the top for side seals. The top seal requires measuring the width of the top of the door frame. If installing a threshold, measure the width of the garage floor where it will be placed.
As a general rule, always add 5-10% extra material to account for mistakes or adjustments that may occur during installation.
Removing Old Weather Stripping
Before installing new weather stripping, properly remove the old material. First, examine how the existing weather stripping is attached—whether with screws, nails, adhesive, or other fasteners. Use tools like a screwdriver, pry bar, or utility knife to remove the old seals without damaging the door or frame.
Once removed, clean the surfaces thoroughly to remove any residue, rust, or debris that could interfere with the new installation. Take this opportunity to inspect the door and frame for any damage that may require garage door repair before proceeding with the latest weather stripping installation.
Cleaning and Preparing the Surface
A clean, smooth surface ensures better adhesion and a tighter seal. Begin by sweeping away dirt and debris from the garage door tracks, frame, and floor. Use a degreaser to clean oil or grease spots, especially on the garage floor near the door.
For metal doors, remove any rust with a wire brush and apply a rust inhibitor if needed to prevent future corrosion. Wooden doors may require sanding of rough areas and application of wood preservative to prevent rot. Vinyl doors should be cleaned with appropriate vinyl-safe cleaners. Ensure all surfaces are completely dry before installation to promote proper weather stripping and sealant adhesion.
Installation Process by Door Material
| Installation Step | Metal Doors | Wooden Doors | Vinyl Doors |
| Bottom Seal Preparation | Remove old seal, clean retainer track | Remove old seal, repair any wood damage | Clean channel, apply silicone lubricant |
| Bottom Seal Fastening | Self-tapping sheet metal screws, 12-18″ apart | Galvanized wood screws, 10-12″ apart | Vinyl-specific screws, 12-16″ apart |
| Side/Top Seal Positioning | Position to make firm contact when closed | Place against stop molding | Apply to clean surface with vinyl-safe cleaner |
| Side/Top Seal Fastening | Pre-drill, use metal screws 8-12″ apart | Use galvanized nails/screws 8-10″ apart | Use vinyl screws or adhesive backing |
| Special Considerations | Apply silicone to the corners | Miter corners at 45°, touch-up paint exposed wood | Allow adhesives to cure completely |
| Common Challenges | Metal can bend if screws overtightened | Wood can split without pre-drilling | Vinyl can crack if improper drill bits are used |
| Tools Needed | Metal drill bits, tin snips | Wood drill bits, saw | Vinyl drill bits, careful pressure |
Professional Installation Tips
While many homeowners can successfully install garage door weather stripping as a DIY project, certain situations require professional expertise. If you’re still learning the ropes on how to install garage door weatherstripping for the first time, consulting with Grayson County Door & Gate professionals is highly recommended. Professional installation is particularly beneficial for the following situations.
- Complex door configurations that require custom-fitting of weather-stripping materials
- Garages with significant floor unevenness that need specialized solutions
- Older garage doors that may need additional repairs before weather stripping can be effective
- Multi-door installations where consistency and efficiency are important
Professional installers bring specialized tools and experience that ensure proper placement and secure attachment of all weather stripping components. They can quickly identify potential issues that might compromise the effectiveness of your weather seals and recommend appropriate solutions.
Additionally, professional installation often comes with warranties and guarantees that DIY projects typically do not offer. With years of experience installing weather stripping on all garage doors, skilled technicians can complete the job in a fraction of the time it might take a homeowner to tackle the project for the first time.
FAQS
What’s the difference between installing weather stripping on wood vs. metal garage doors?
Installing weather stripping on a wood garage door might involve using screws or nails for attachment, potentially requiring pre-drilling to prevent splitting. On a metal door, installation typically uses screws or rivets and can sometimes be easier due to a more uniform surface.
How long does garage door weather stripping last?
Garage door weather stripping typically lasts 10 to 25 years, depending on the material, exposure to elements, and quality of installation. However, harsh weather conditions and direct sunlight can accelerate its deterioration.
Is the weather stripping installation different for insulated garage doors?
The installation method for weather stripping is generally similar for insulated and non-insulated garage doors, focusing on creating a seal around the opening. However, the thickness or design of the insulated panels might require specific types of weather stripping or slightly different attachment techniques.
Can I reuse old weather stripping when replacing it?
It is generally not recommended to reuse old weather stripping when replacing it. Old stripping is often worn, cracked, or compressed, which will no longer provide an effective seal against drafts, moisture, and pests.
How can I tell if my weather stripping was installed correctly?
You can tell if your weather stripping was installed correctly if it creates a continuous, tight seal when the door is closed, with no visible gaps or light coming through. It should also not interfere with the smooth operation of the new garage door.
End Note
While this guide provides detailed instructions on how to install garage door weather stripping, some homeowners may prefer professional installation, especially for complex situations or multiple doors. Grayson County Door & Gate offers professional weather stripping installation services with guaranteed results. With proper installation and maintenance, quality weather stripping can last for years, providing continuous protection against the elements and helping maintain the efficiency and functionality of your garage. Whether choosing DIY or professional installation, investing in proper garage door sealing is a smart decision for any homeowner.